Thursday, November 28, 2019

3D - Personal project final renders

I went back into Marmoset after receiving feedback from my tutor, regarding how to better present my model.

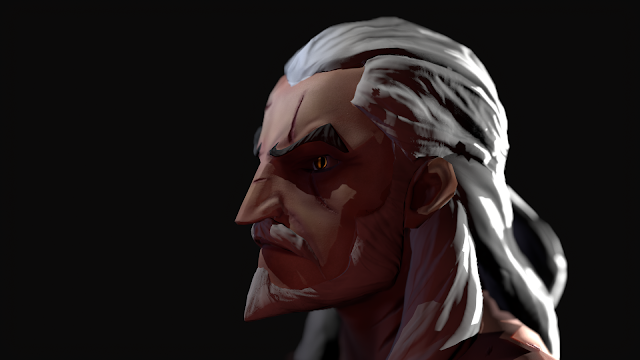
I edited the sky light and background colours, still opting for a warmer light but going for a more neutral and dark coloured background colour. I then edited some of my maps, such as adding SSS and the size reference tool so that it worked properly, and using global illumination to create more convincing bounceback and shadows. This immediately improved the quality of my model, making it a more convincing reproduction of an actual character instead of a lifeless object.

Adjusting the sky light

Size reference 

Adding SSS


I added new lights, including bright rim lights for a dramatic outline, and fill lights to add stark shadows which enhanced the planes of the bust, particularly on the face. I played around with warmer and cooler lights, and I ended up with a mix of both, as the sky light was warmer but the fill and rim lights were cool.

Fill lights

Rim lights

Cameras

Final camera angles

Finally I added warm orange spot lights within the eyes to make them glow and stand out. The effect was subtle but very effective as it added an element of the supernatural to the model. I took my final render shots, using similar camera angles to my first shots. I was very pleased with the final result and the feedback that I received pushed the appearance of the model even further.


Wednesday, November 20, 2019

Digital Reflection 11 - Group project - Silhouettes and Sketches

I started with the character concept, in particular producing silhouettes to rapidly generate ideas. I played around with the idea of having a courtesan town character as well as a more formally dressed character, using both elements of male and female western clothing such as chaps and suit ties, mixed with dresses and decorated hats.  From my research I noticed that female wild west dresses from the 19th century feature puffed areas of skirting around the hips, which an narrow down further towards the feet. This made for some interesting designs, and allowed me to experiment greatly using sharp shape language.

I also added accessories such as bandoliers to give her more of a gang-leader aesthetic, which produced an exciting clash with the extravagance of some of her formal wear. At the same time I experimented with stances to illustrate her as a threatening and capable leader, yet elegant leader.


Next, I produced a sheet to determine the character's body type, ear shape and facial scars in more detail. Stereotypically I found that elves in high fantasy are portrayed as tall and slim. I used my character reference sheets as well as the team moodboard to combine these features with a type of stylisation. I looked at games such as We Happy Few and Dishonored whilst making the different silhouettes, and ended up with a sharp edged, tall and slim figure. I thought that the pointed edges to her body acted as useful shape language to represent her personality and character traits from a glance; hard, malicious and haughty. 

I continued experimenting with the shape of her ears, thinking about the shape language of the body. I wanted the ears to be longer as this matched the type of extravagance that the character has in my clothing silhouettes. In addition, the pointed shape of the ear adds to the effective shape language that I produced for the body.

Finally on the same sheet I considered different facial scars that could add more narrative to the character and her backstory. I decided on a curved scar as I liked how it contrasted against the sharpness of all the other shapes of the character. The final choices were combined into one neatened sketch of the character's body, so that I would have a strong base to work on when adding the clothes.

Digital Reflection 10 - Group project - Reference Gathering

I compiled the moodboard images that we gathered as a group and put them into one place for my own reference.This served well as a guide for the level of stylisation we were going for, as well as colours and proportions. I then made a fantasy themed and a western themed moodboard for each aspect that I was designing: the elven town lady character, the saloon interior diagram, and the outdoor town duelling area moodshot. I did a fantasy and a western moodboard for each of these as our game combines these two themes, and I want to be able to experiment with the balance of these themes in my designs.


For example, for the character I did a moodboard focused on portrayals of elves in games, art, and movies. This included elements such as skin colour, body type, stylisation, shape language and colour palette. My other character moodboard on the other hand, featured female town fashion from the wild west, examples of concepts produced for this character role and relevant poses. I wanted her to have the appearance of a wealthy or well-off woman in the town on the surface, but with a hardened no-nonsense demeanour.


I used the same method of research for the saloon interior, looking at actual saloons and stylised artwork, as well as medieval fantasy taverns from games and concepts, which appeared similar to me but more cluttered, and filled with more unusual and fantastical items.


For the town duel moodshot, I took examples from 3D platform games of moodshot concepts that had been produced. These give an impression of composition, scale and mood that I could start from, e.g. the warm bright oranges and dusty unsaturated building facades, as well as areas of shade, compression and wide open spaces.


Tuesday, November 19, 2019

3D - Finishing up my personal project

I tried to bring the model into Marmoset Toolbag, and attempt to bake it here, but it was easier to export the textures from Substance Painter and plug them in to the low poly model in Marmoset, as they still retained the bake information. When exporting the texture maps, I learnt how to configure my own presets, e.g. combining certain maps like roughness, AO, metallic. However, instead of making my own preset I used the Unreal 4 preset which combined these maps.

Initial attempt baking in Marmoset


I went into photoshop to see how the maps had been distributed into Red, Green and Blue channels respectively. I then went into marmoset, and began setting up my materials. I had to invert the Y channels so that they appeared as I had textured them, and then I went on to altering the sky light.
I wanted to play around with forest lighting, which is a setting that would be seen in the Witcher 3. I also experimented with Subsurface Scattering, which reacted to the warm rim light I used at the back of the head. The ears had a slight transparency to them which mimicked the effects of light hitting skin. Although there wasn't a realistic level of SSS, it added a noticeable reddish hue and lifelike depth to the surface of the skin.


Plugging in the maps


Adding a shadow plane and a sky light


Rim light


Experimenting with a top light


Altering lighting colours


Finally, I moved several cameras into the correct positions that I wanted to take my renders from, and experimented in the settings. Here, I altered the Depth of Field, focus levels and aperture. I also altered the contrasts and saturation. I was very pleased with the results of these renders, as I feel that the lighting and camera angles and level of focus enhances the best qualities of the model. I ensured that I took different render shots with different sunlight positions to see which ones I preferred.


Overall, this personal project was a huge challenge, but I learnt how to meld the processes I learnt in class altogether to create my own piece of work inspired by other artists. Although it is a piece of fanart and not my original character, this piece has taught me how to translate ideas into my own style and to add my own flair.


Final Renders


Traditional Reflection 4

I completed my second test piece from class. This time I took a different approach - using darker and more even tones for the cloth instead of lighter tones, and then lightening them with a putty rubber where necessary. This resulted in a lot more attention being brought to the objects rather than the drapery. I also refrained from shading the background as I thought it would be too dark alongside the fabric if I did this.


I was very pleased with the way that I shaded the skull. I was more liberal with contrasts than the last attempt at a shaded skull, especially with delicate details and line weight such as cracks and hollow areas. I think that the glasses are a bit too small, but they manage to stand out amongst the other objects due to the use of highlights and line weight which was difficult to achieve.


Overall I was very pleased with the outcome of this piece.


Test Piece 2


Monday, November 18, 2019

3D Reflection 9


This session started with an edit of the UV map of the face. Instead of putting seams around the eyelids, I collapsed the holes in the low poly and did a lot of adjusting so that the shape around the eye matched up with the high poly. I also had to re bake my model four times, as the eye area was very messy. I exported the lop poly eyes alone, leaving out the high poly as I thought this might help to improve the bake.

The results were a lot cleaner after editing the shape around the eyes and only importing the low poly eyeballs. Whilst the process was very challenging and lengthy, it would ensure that my model would retain a better quality in the long run.


Then the model was imported into substance, and I started by baking my mesh maps and working on the skin first. I used a base mask for the skin, and heavily edited the layers to suit my purposes. I used a lot of reference, including the original character model from The Witcher 3 and the stylised model by Julen Urrutia. The skin needed to be pale but realistic, and I wanted to show blemishes such as darker and lighter patches, to make the character look more weathered and closer to the source material.


Next on another layer I added scars. I used a blend of heights to bring out the scars, as well as adjusting the roughness levels to show the shiny surface of scar tissue. I then went on a layer underneath to add reddish and purplish patches so that the scars blended nicely into the skin.


The next stage was to texture the hair. Some areas of the bake created shading issues, but this was rectified just by painting them as normal. I used subtle grey tones as I did not deem it necessary to use dark lines when texturing the hair.


Finally I textured the eyes, by masking out areas that needed to be painted separately and then using reference heavily to achieve the correct tones and colours. I used mainly warm yellows and dark browns to add depth. I also used a lower roughness value to achieve a shiny effect. I was impressed by the depth that I could get by using a gradient of colour.

Compared to Urrutia, my texturing is a lot more realistic and detailed, but it still works as a stylised piece due to the proportions and shaping in Zbrush. I still have to render the piece, but overall I enjoyed the texturing process, especially overcoming the baking issue around the eyes. I plan to render using Marmoset next.