Monday, December 16, 2019

3D - Blog topic 5

In order to stay organised for the group project, I did a personal plan for my rooms and character, based on the template from in class. I tailored the details to my project specifically, such as for the stretch goals I added dust particles in the tomb and sound effects of running water for the ponds in the courtyard garden area that I planned. 


I did not do the group section yet as I was going to wait until everyone had made a plan to fill this out, much like the asset management lists we used in other projects. 


Digital Reflection 20 - Finishing the moodshot

I decided to use the 3D blockout method that I had practised previously for the landscape photobashing task in order to produced the moodshot. Using my building designs I made some simple block outs in 3Ds Max, and arranged them according to my thumbnail and street layout designs. I then set up a perspective camera, so that it matched the composition of the detailed thumbnail and took a series of render passes. I took a main fully lit render, Zdepth render, a clown map, and a lighting pass from the left and the right hand side so that the lighting in photoshop would be more accurate, and that it would set a stronger mood in advance before doing the rest of the moodshot.

Blocking out buildings in 3Ds Max


Creating a Camera


Camera View I chose


Using a HDRI for lighting


Rendering


Applying directional lights


Creating a clown map


I then used a combination of photobashing and handpainting to render the rest of the moodshot. I used a similar process to the landscape photobashing task that we practised previously as it was more efficient. 

I then played around with the raw camera filter to edit the photos, and played with the clarity, tinting and saturation setting. I wanted the moodshot to portray a sense of desert heat in the afternoon during a duel, but I also wanted there to be a sense of magic in the air, so I tried to achieve a balance of the more fantastical pink and the warm orange of the desert. I added several fantasy elements to the moodshot, including the magic windmill, water trough, the slight tint and finally the flying dragons in the sky to drive home the sense of a fantasy world mixed in with the wild west.


Finally I added stylistic effects similar to that of the character design, such as the bright highlights, and the silhouettes of different races based on the characters designed by the group. I think that the final moodshot represents how the 3D platformer would play quite well, and dictates the level of  fantasy and western elements in the style. To improve, I could have done some colour versions of the crowd silhouettes, and maybe made some signs for the building facades, such as shop names. Overall, I am pleased with the outcome.

Final moodshot

Thursday, December 12, 2019

Digital Reflection 19 - Beginning the moodshot

I started by gathering my reference for the moodboard together, and doing another page focused on platform game screenshots for composition ideas. I based some my thumbnails off of these compositions to get a more distinct feel of a 3D platformer.


Using existing platformers for reference


I then chose my thumbnail to develop. I liked the idea of showcasing a stand-off scene in a town environment, as it matched my character's setting with her saloon.

Initial silhouettes


Detailed Thumbnail


I started developing by making building facade silhouettes to identify shape. I used similar shape language to the interior of the saloon and the character, as well as integrating shapes from other characters such as slanted sharp edges and wooden beams to match the fairy for example.


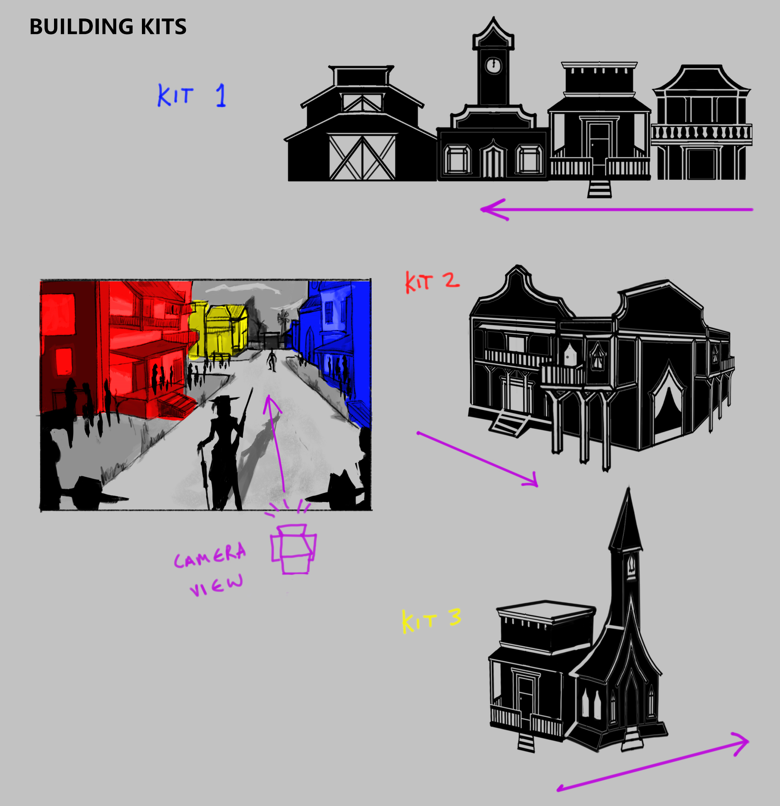
I also developed a modular building arrangement for the streets. I wanted a variety of heights and shapes, as well as colours. The camera perspective is represented by the pink arrows. The moodshot would be showing the back of the character. Then I made a page to explore street dressings in more detail. These were the areas that I was going to add a lot more fantasy to.


Digital Reflection 18 - adding extra details to the interior

I received feedback from my tutors about how I could further communicate textures to a 3D artist and to the rest of my group to solidify the style guide. I took a piece of furniture as an example, the bar from the saloon, and did a version of how it would look textured in game. I chose this piece as it allowed me to showcase two types of hand painted wood material, polished and dull.


I also did a quick sketch of how the outside of the saloon would look, as the tutors were unsure about the interior architectural structure of the building. Doing a sketch of the outside allowed me to convey my thought process when designing the interior.


I lastly put in a player pathway in the interior, as there is a clear path that could be used in the game. The player would enter through the saloon doors, go up to the stage area to perform an action, and then move upstairs along a platform-like balcony area and finally outside to the last door, where they could continue on to another part of the level.


Doing these extra details helped me to further flesh out my ideas and add clarity to my presentation.

Monday, December 9, 2019

3D Reflection 11 - Using Perforce Pt. 2

The next lesson we linked our levels using perforce again, and focused on adjusting the sky light in the master level and putting in spotlights to enhance areas of the buildings.

I tried making a dusk coloured sky light, using pinks, blues and yellows. I thought these colours matched the colour schemes of the buildings well. I then tried messing around with spot lights, adjusting the illumination level and the falloff. I made a line dancing area in my corner, and placed lights on the corners . At first the shadows cast by the lights were distracting so I switched them off, which resulted in a cleaner look. 

Finally, I messed around with the mannequins, placing lots on the line dancing area, changing their colours and playing with the physics options.

Overall I really enjoyed using Perforce for the first time, it made me feel coordinated and allowed me to simulate a working day in industry.

Adjusting the Skylight

Altering spot lights

Changing the mannequin settings

3D Reflection 10 - Using Perforce

We tried using Perforce for the first time in a team. Setting up a user and a connection was the first step, and although it was difficult to remember the stages, I found that it was straight forward once practising it a few times. In a team, we then took a screenshot of the Unreal western level provided from a birds-eye view and did a series of street plans. I had a corner to populate with buildings, and using perforce we linked our files by activating source control to check out each other's work. One of the most challenging things was making sure that I remembered to check out my level, as there were times that I lost my progress because I synced with an older version of the level. I also sometimes worked on the master level by accident, so I had to remember to check what level was active before working.

Setting up Perforce


Connecting Source Control

Checking out my level

Assembling my corner

The Master Level

Thursday, December 5, 2019

Digital Reflection 17 - interior breakdown development and final

I developed the inside objects further, particularly by making orthographic sketches of the key objects and adding details to them. This would help me to set up my final construction drawing and to dictate how objects would look from different angles for a 3D designer.

Object details from different angles

First version of construction drawing

I produced a version of the final construction but I was not entirely satisfied with the colours. They looked too bright and friendly for a gang leader's HQ. Therefore I did some colour variations playing with brightness values and tones of blue, purple and brown. I was much more satisfied with the final.

Variations of colour - similar to character to match her aesthetic


Final Construction drawing 


My feedback form my tutor was to produce an example of how an object would look textured in the game and to share it with my team as part of the style guide.

My message to my team about feedback